In ASP.NET Core, the AccountController is a controller which is created automatically when we activate authentications in our project. This activation is done when we are creating the ASP.NET project, either in Visual Studio or using the dotnet CLI. If you do not activate the authentications when you are creating the project, then the AccountController will not be created.
Let’s see step by step how to activate authentications, both in Visual Studio 2019 and using the dotnet CLI.
Activating Authentication with Visual Studio
To create an ASP.NET Core project with authentication, we do the following.
1) Open Visual Studio and create a new project:

2) Select ASP.NET Core Web Application and pressNext:

3) Let’s give it any name we want, and press Create.
4) We can select a template for our ASP.NET Core application. In my case, I’m going to select Web Application (Model-View-Controller).
5) Click on the “Change” link at the top right of the pop-up window to activate the authentication:

6) Then, choose how you want to authenticate users on your system. If you want to use your own database to save your users, choose Individual User Accounts, and in the DropDownList, choose Store user accounts in-app, and then press OK:

7) Now press the Create button
With this, you are going to create an ASP.NET Core project with authentication enabled. If you are using ASP.NET Core 2.0 or an earlier version, your AccountController controller will be created without problems.
However, if you use ASP.NET Core 2.1 or newer, you will see that the AccountController is not in the Controllers folder. And not only that, but if you run your project, and click on Register, you will get a view with a registration form, which does not appear in your Views folder or in your Areas folder. Why?
Razor Class Libraries
The reason you cannot see the AccountController or the views of Login and Registration forms is because of the Razor Class libraries. In these libraries, we can place Razor files along with their “code-behind” to encapsulate different “views” of our page. I say “views”, because they really aren’t views like the ones we know in MVC, they are actually Razor Pages.
A Razor Page is like a normal Razor view, which also contains a C# class, through which we can process HTTP requests and perform actions. That is, instead of having a set of views that share a controller, we can have a set of pages, each with its own class, in order to perform the logic that we would otherwise place in the controller. An example of this logic would be to receive an HTTP Post to create a record in a database.
What does this have to do with our AccountController and our registration page? Well, the logic and user interface of everything related to account management (registration, login, etc.) has been placed in a library of razor classes. That’s why it does not come out in your ASP.NET Core 2.1 project onwards.
This means that you can have the functionality of managing user accounts without having to worry about the code of such functionality. This on the one hand is good, because you have less code to maintain. However, sometimes, we will want to make adjustments to the register page, or login page, or whatever logic of this functionality. How can we do this?
Well, in Visual Studio you must right click on your ASP.NET Core project, then give Add > New Scaffold Item:

Then, select Identity, and press Add:
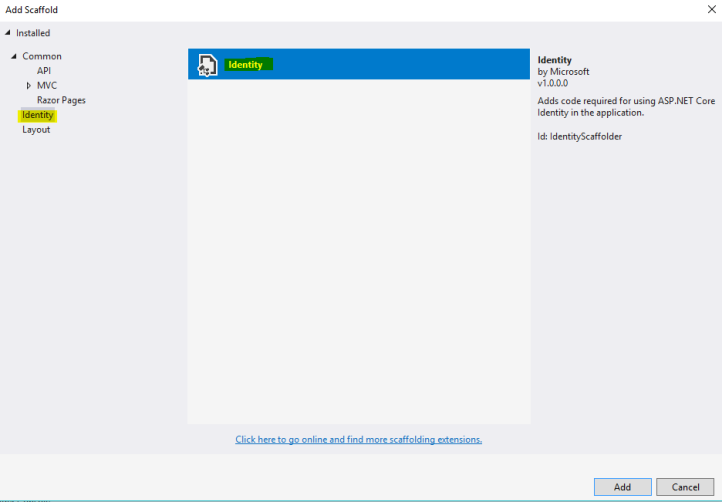
After this, apopup window will show up with the files to be overwritten. For example, we have Login, Register, Logout, among others. We can also overwrite all the files. I, in my case, will only choose Register, and, in the data context class, I will place the ApplicationDbContext that was created by default with the application, and then press Add:

After a few seconds, we will have our Razor Page created in Areas/Identity/Pages/Account/Register. From here, we can customize the content and functionality of the registration page.
Activating Authentications with the dotnet CLI
With the dotnet CLI we can create an ASP.NET Core project with authentications, just like we did with Visual Studio.
Note: I will use dotnet CLI version 2.2 for this section. The following may not work for earlier versions of the dotnet CLI.
The first thing we must do is install a tool for generating code:
dotnet tool install -g dotnet-aspnet-codegenerator
Now, we are going to create an ASP.NET Core MVC project with the authentications activated, for that we use the following command:
dotnet new mvc -n ExampleProject -au individual
The important part of the previous command is the -au individual, with which we indicate that we want to activate authentications with individual mode in our app (the same as we did with Visual Studio above). Now, you may need to navigate to the folder that was created with your project. Then, install the following package:
dotnet add package Microsoft.VisualStudio.Web.CodeGeneration.Design
If needed, do a restore:
dotnet restore
Now, we can use identity to generate the razor pages. If we use the -h option, we can see the list of scaffolding options:
dotnet aspnet-codegenerator identity -h
If you want to see the list of available files to overwrite, you can use the following command:
dotnet aspnet-codegenerator identity -lf
Note: -lf comes from listFiles
You should get a list like the following:
File List:
Account.AccessDenied
Account.ConfirmEmail
Account.ExternalLogin
Account.ForgotPassword
Account.ForgotPasswordConfirmation
Account.Lockout
As we did with Visual Studio, we will only generate the registration page:
dotnet aspnet-codegenerator identity -fi Account.Register -dc ExampleProject.Data.ApplicationDbContext
So now, if you search in Areas/Identity/Pages/Account, you will see the Register page created. In my case, I had to pass the full name of the ApplicationDbContext so that I would not create a new ApplicationDbContext.
Summary
- If you use ASP.NET Core 2.0 or earlier, the steps given in Visual Studio should generate your AccountController
- If you use ASP.NET Core 2.1 or later, the Identity functionality will be found in a library of razor classes. There is no AccountController.
- Razor class libraries allow us to place razor pages in a separate project that we can share among several projects
- We can generate Identity scaffolding using the dotnet CLI.
Regards!

THX
LikeLike