If we want to use Entity Framework Core 2, we don’t need .NET Core, we can install Entity Framework Core 2.0 in any .NET implementation that’s implements .NET Standard 2.0.
.NET Standard is a set of API’s which every .NET implementation has to offer in order to be compliant with the Standard. This means that if there is a library that was build using only the API’s from the .NET Standard, then that library can run in any .NET implementation that complies with .NET Standard.
Entity Framework Core 2.0 uses the API’s of .NET Standard 2.0, in consequence, we can use EF Core 2.0 in any platform that implements .NET Standard 2.0. For our purposes, this means that we can use EF Core 2.0 in:
- .NET Core 2.0
- .NET Framework 4.6.1+
What’s really exciting is that we are able to use EF Core 2.0 in .NET Framework 4.6.1+. This means that we are able to use EF Core in Winforms apps, WCF, WPF, Web Forms, ASP.NET MVC 5 apps, etc. Let’s see a demo of this.
Demo – Installing Entity Framework Core 2.0 in Winforms
Let’s install EF Core 2.0 in a Winforms app. The idea is that we can see that we are not limited to .NET Core when wanting to enjoy the benefits of EF Core 2.0. The fundamental purpose of this demo is to install EF Core 2.0 in a project that does not use .NET Core. The same procedure of installation applies to other types of projects, such as Web Forms, ASP.NET MVC 5, WPF, etc.
Let’s create a Windows Forms App. I’m using Visual Studio 2017 – Community Edition. It’s important that you select a .NET Framework version equal to or higher than version 4.6.1. I’ll use .NET Framework 4.7:
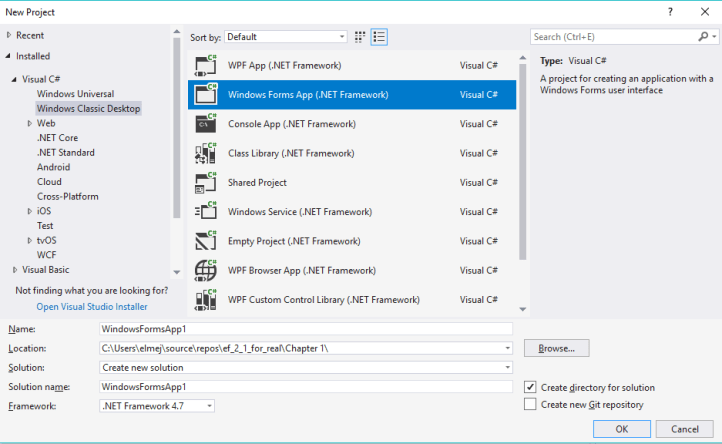
Then press OK, and we’ll have the project created.
Steps to install Entity Framework Core 2.0 in .NET Framework
Step 1 – Install Nuget packages: The first thing that we are going to do is to install some required nuget packages. For this we can go to the Package Manager Console, which is located in Tools > Nuget Package Manager > Package Manager Console. With this little console we can install our packages. Paste the following command in the console:
Install-Package Microsoft.EntityFrameworkCore.SqlServer
We use this command to Install Entity Framework Core and its packages to use SQL Server. The idea is that this package will install all the dependencies that we need to work with EF Core and SQL Server. If you don’t want to use SQL Server, then you can use other packages that use the DBMS (Database Management System) of your desire. I also recommend to check the official list of providers of EF Core: https://docs.microsoft.com/en-us/ef/core/providers/index
Now, let’s install this package that will allow us to use EF Core tooling:
Install-Package Microsoft.EntityFrameworkCore.Tools
This package will allow use to use a command line interface (CLI) to be able to do some tasks with EF Core. Finally, let’s install this optional package:
Install-Package Microsoft.Extensions.Logging.Console
This one will allow us to log queries generated by Entity Framework.
Step 2 – Configuration: Now we are going to do the minimum configuration we need to use EF Core. First, we’ll need a DbContext, or more precisely, a class that inherits from DbContext.
Create a folder in your project, call it “Models”. And inside of this folder, create a class called ApplicationDbContext. Use this code to configure it:
class ApplicationDbContext: DbContext
{
        protected override void OnConfiguring(DbContextOptionsBuilder optionsBuilder)
        {
            optionsBuilder.UseSqlServer("Data Source=(localdb)\\mssqllocaldb;Initial Catalog=DemoWinForms;Integrated Security=True")
       .EnableSensitiveDataLogging(true)
                .UseLoggerFactory(new LoggerFactory().AddConsole((category, level) => level == LogLevel.Information && category == DbLoggerCategory.Database.Command.Name, true));
        }
}
In the past code, we placed the ConnectionString directly in the code to make the demo faster. It is good practice to place the ConnectionString in an external resource.
Officially, we finished installing EF Core 2.0 in your project. This same sequence of steps can be used on other kind of projects like ASP.NET MVC 5, Web Forms, WPF, WCF, etc.
Test
Let’s make a small test, let’s create a database from our C# code. The first thing we need is a migration. If you don’t know migrations, you can think about them as a way to show the changes that you are going to do to your database, things like adding tables, columns, etc.
Create another class in the Models folder, called Students, like this:
class Student
{
    public int Id { get; set; }
    public string Name { get; set; }
}
This class will help us saving information about students. What we will do now is to use migrations to “transform” this class into a table of a database in SQL Server. The Id and Name properties will become columns of the new table.
Let’s return to our ApplicationDbContext class, and let’s place the following property inside of the class:
public DbSet<Student> Students { get; set; }
What this property does is to indicate to EF Core that we are going to need a table in the DBMS that we configured (SQL Server), and we are going to communicate to that table through this property. Also, we are indicating that the new table will use the Student class as a model.
In order to to the migration, let’s go to the Package Manager Console and let’s use the following command:
Add-Migration Initial
What this command does is to create a migration with the name “Initial”. We could have used any other name. After running this command, we will be presented with a class, with the same name as the migration. In this class (which is what we call a migration) we can see the changes that are going to occur at the database level. The idea here is that you should check the class, and see if everything is good before actually committing the changes to a database. You can think of this step as a staging step. In our case, because the database does not exist, it will be created for us.
Let’s tell EF Core to apply these changes for us in a new database. There are several ways of doing these, we are going for the easiest one, which is using the following command:
Update-Database
This command is going to create a Database in our SQL Server or LocalDb instance that we indicated in the ConnectionString. Note: If you used the same connectionString as me, you must have LocalDb installed on your machine, and an instance with the same name as the one indicated in the connectionString.
When the command finishes running, you will have your database created. If you used LocalDb, then you can use the Visual Studio SQL Server Object Explorer to view the database. You can find this window in View > SQL Server Object Explorer. Then follow the following route:
SQL Server > [Instance of LocalDb] > Databases
Search for the database with the name that you indi
Find the database with the name you entered in the ConnectionString. In my case it is “DemoWinForms”:

As you can see, from a simple Winforms application we have been able to use our EF Core 2.0.
Summary
You don’t need .NET Core in order to use EF Core. You can follow the steps on this post to use EF Core in any .NET implementation that complies with .NET Standard 2.0.
